News
News  Market Data
  Discover
Support: 888-992-3836
Copyright © 2023 InvestorsHub Inc.


Register for free to join our community of investors and share your ideas. You will also get access to streaming quotes, interactive charts, trades, portfolio, live options flow and more tools.
$WLOL BarChart Technical Analysis
http://www.barchart.com/technicals/stocks/WLOL
UPSIDE GAP TWO CROWS
The Bearish Upside Gap Two Crows Pattern is a three-candlestick pattern and it signals a top reversal. The first candlestick is a long white candlestick followed by a real body that gaps higher. Then another black real body appears, which opens above the second day’s open and closes under the second day’s close, completing the pattern
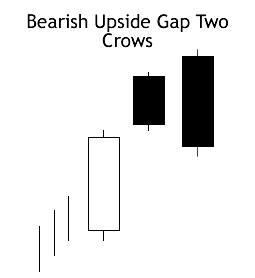
Recognition Criteria:
1. Market is characterized by uptrend.
2. We see a long white candlestick in the first day that signals the continuation of uptrend.
3. Then we see a black body with a gap up on second day.
4. The third day is characterized by another black candlestick having an opening above the first black day and also closing below the body of the first black day. The body of third day engulfs the body of the first day.
5. The close of the second black candlestick is still above the close of the first long white candlestick.
Explanation:
The market is in an uptrend and it displays a higher opening with a gap. However the new highs of the day cannot hold and the market forms a black candlestick. However the bulls still comfort themselves by the fact that the close on this black candlestick day is still above the prior day’s close. The third day however increases the bearish sentiment displaying another new high but failing to hold these highs until the close. Also the day closes below the prior day’s close, which is another bearish sign. . So the following question becomes relevant. If the market is so strong, why the new highs fail to hold and why market closes lower? The answer is clear. Market is not now as strong as the bulls would like to believe. 
The triple-smoothed EMA is very different from a plain EMA. In a plain EMA the latest few days dominate and the EMA follows recent prices quite closely; however, applying it three times results in weightings spread much more broadly, and the weights for the latest few days are in fact smaller than those of days further past. The following graph shows the weightings for an N=10 triple EMA (most recent days at the left).
$BBDA BarChart Technical Analysis
http://www.barchart.com/technicals/stocks/BBDA
$GAEC BarChart Technical Analysis
http://www.barchart.com/technicals/stocks/GAEC
The period for the moving averages on which an MACD is based can vary, but the most commonly used parameters involve a faster EMA of 12 days, a slower EMA of 26 days, and the signal line as a 9 day EMA of the difference between the two. It is written in the form, MACD (faster, slower, signal) or in this case, MACD(12,26,9).
3. Counterparty risk (Risks Associated with ETF’s)
A synthetic ETF has counterparty risk, because the counterparty is contractually obligated to match the return on the index. The deal is arranged with collateral posted by the swap counterparty. A potential hazard is that the investment bank offering the ETF might post its own collateral, and that collateral could be of dubious quality. Furthermore, the investment bank could use its own trading desk as counterparty. These types of set-ups are not allowed under the European guidelines, Undertakings for Collective Investment in Transferable Securities (UCITS), so the investor should look for UCITS III-compliant funds.
Ichimoku Clouds
Introduction
The Ichimoku Cloud, also known as Ichimoku Kinko Hyo, is a versatile indicator that defines support and resistance, identifies trend direction, gauges momentum and provides trading signals. Ichimoku Kinko Hyo translates into "one look equilibrium chart". With one look, chartists can identify the trend and look for potential signals within that trend. The indicator was developed by Goichi Hosoda, a journalist, and published in his 1969 book. Even though the Ichimoku Cloud may seem complicated when viewed on the price chart, it is really a straight forward indicator that is very usable. It was, after all, created by a journalist, not a rocket scientist! Moreover, the concepts are easy to understand and the signals are well-defined.
Calculation
Four of the five plots within the Ichimoku Cloud are based on the average of the high and low over a given period of time. For example, the first plot is simply an average of the 9-day high and 9-day low. Before computers were widely available, it would have been easier to calculate this high-low average rather than a 9-day moving average. The Ichimoku Cloud consists of five plots:
Tenkan-sen (Conversion Line): (9-period high 9-period low)/2))
The default setting is 9 periods and can be adjusted. On a daily
chart, this line is the mid point of the 9 day high-low range,
which is almost two weeks.
Kijun-sen (Base Line): (26-period high 26-period low)/2))
The default setting is 26 periods and can be adjusted. On a daily
chart, this line is the mid point of the 26 day high-low range,
which is almost one month).
Senkou Span A (Leading Span A): (Conversion Line Base Line)/2))
This is the midpoint between the Conversion Line and the Base Line.
The Leading Span A forms one of the two Cloud boundaries. It is
referred to as "Leading" because it is plotted 26 periods in the future
and forms the faster Cloud boundary.
Senkou Span B (Leading Span B): (52-period high 52-period low)/2))
On the daily chart, this line is the mid point of the 52 day high-low range,
which is a little less than 3 months. The default calculation setting is
52 periods, but can be adjusted. This value is plotted 26 periods in the future
and forms the slower Cloud boundary.
Chikou Span (Lagging Span): Close plotted 26 days in the past
The default setting is 26 periods, but can be adjusted.
This tutorial will use the English equivalents when explaining the various plots. The chart below shows the Dow Industrials with the Ichimoku Cloud plots. The Conversion Line (blue) is the fastest and most sensitive line. Notice that it follows price action the closest. The Base Line (red) trails the faster Conversion Line, but follows price action pretty well. The relationship between the Conversion Line and Base Line is similar to the relationship between a 9-day moving average and 26-day moving average. The 9-day is faster and more closely follows the price plot. The 26-day is slower and lags behind the 9-day. Incidentally, notice that 9 and 26 are the same periods used to calculate MACD.

Analyzing the Cloud
The Cloud (Kumo) is the most prominent feature of the Ichimoku Cloud plots. The Leading Span A (green) and Leading Span B (red) form the Cloud. The Leading Span A is the average of the Conversion Line and the Base Line. Because the Conversion Line and Base Line are calculated with 9 and 26 periods, respectively, the green Cloud boundary moves faster than the red Cloud boundary, which is the average of the 52-day high and the 52-day low. It is the same principle with moving averages. Shorter moving averages are more sensitive and faster than longer moving averages.
There are two ways to identify the overall trend using the Cloud. First, the trend is up when prices are above the Cloud, down when prices are below the Cloud and flat when prices are in the Cloud. Second, the uptrend is strengthened when the Leading Span A (green cloud line) is rising and above the Leading Span B (red cloud line). This situation produces a green Cloud. Conversely, a downtrend is reinforced when the Leading Span A (green cloud line) is falling and below the Leading Span B (red cloud line). This situation produces a red Cloud. Because the Cloud is shifted forward 26 days, it also provides a glimpse of future support or resistance.
Chart 2 shows IBM with a focus on the uptrend and the Cloud. First, notice that IBM was in an uptrend from June to January as it traded above the Cloud. Second, notice how the Cloud offered support in July, early October and early November. Third, notice how the Cloud provides a glimpse of future resistance. Remember, the entire Cloud is shifted forward 26 days. This means it is plotted 26 days ahead of the last price point to indicate future support or resistance.

Chart 3 shows Boeing (BA) with a focus on the downtrend and the cloud. The trend changed when Boeing broke below Cloud support in June. The Cloud changed from green to red when the Leading Span A (green) moved below the Leading Span B (red) in July. The cloud break represented the first trend change signal, while the color change represented the second trend change signal. Notice how the Cloud then acted as resistance in August and January.

Trend and Signals
Price, the Conversion Line and the Base Line are used to identify faster, and more frequent, signals. It is important to remember that bullish signals are reinforced when prices are above the cloud and the cloud is green. Bearish signals are reinforced when prices are below the cloud and the cloud is red. In other words, bullish signals are preferred when the bigger trend is up (prices above green cloud), while bearish signals are preferred when the bigger trend is down (prices are below red cloud). This is the essence of trading in the direction of the bigger trend. Signals that are counter to the existing trend are deemed weaker. Short-term bullish signals within a long-term downtrend and short-term bearish signals within a long-term uptrend are less robust.
Conversion-Base Line Signals
Chart 4 shows Kimberly Clark (KMB) producing two bullish signals within an uptrend. First, the trend was up because the stock was trading above the Cloud and the Cloud was green. The Conversion Line dipped below the Base Line for a few days in late June to enable the setup. A bullish crossover signal was triggered when the Conversion Line moved back above the Base Line in July. The second signal occurred as the stock moved towards Cloud support. The Conversion Line moved below the Base Line in September to enable the setup. Another bullish crossover signal was triggered when the Conversion Line moved back above the Base Line in October. Sometimes it is hard to determine exact Conversion Line and Base Line levels on the price chart. For reference, these numbers are displayed in the upper left hand corner of each chart. As of the January 8 close, the Conversion Line was 62.62 (blue) and the Base Line was 63.71 (red).

Chart 5 shows AT
The MACD fluctuates above and below the zero line as the moving averages converge, cross and diverge. Traders can look for signal line crossovers, centerline crossovers and divergences to generate signals. Because the MACD is unbounded, it is not particularly useful for identifying overbought and oversold levels.
$AXLX BarChart Technical Analysis
http://www.barchart.com/technicals/stocks/AXLX
Technical Indicators are the often squiggly lines found above, below and on-top-of the price information on a technical chart. Indicators that use the same scale as prices are typically plotted on top of the price bars and are therefore referred to as "Overlays."
$ORRV BarChart Technical Analysis
http://www.barchart.com/technicals/stocks/ORRV
Volatility is based on the standard deviation, which changes as volatility increases and decreases. The bands automatically widen when volatility increases and narrow when volatility decreases. This dynamic nature of Bollinger Bands also means they can be used on different securities with the standard settings.
SEC Filings Explained ~ Form 3
Form 3 is an SEC filing filed with the US Securities and Exchange Commission to indicate a preliminary insider transaction by an officer, director, or beneficial (10%) owner of the company's securities. These are typically seen after a company IPOs when insiders make their first transactions. After a Form 3 is filed, future filings of the same nature are filed under Form 4 (standard disclosure) or Form 5 (annual disclosure).
$WSRA BarChart Technical Analysis
http://www.barchart.com/technicals/stocks/WSRA
BULLISH UNIQUE THREE RIVER BOTTOM
The Bullish Unique Three River Bottom Pattern is an extremely rare bottom reversal pattern. Its first candlestick is an extended black candlestick then followed by a second black real body closing higher than the first candlestick’s close, and the third candlestick is a white candlestick with a very small real body. The real white body shows that the market lost the selling pressure.

Recognition Criteria:
1. Market is characterized by a downtrend.
2. We see a long black candlestick in the first day.
3. Then we see a Hammer-like black candlestick on the second day.
4. The lower shadow of the second day sets a new low.
5. Then we see a short white candlestick, which is below the second day candlestick.
Explanation:
With the Unique Three River Bottom bull pattern, we first see a long black stick in a falling market. The next day opens at a higher level, however bearish sentiment is strong causing a new low during the day however the day closes near the high thus producing a small black body within the body of the first day. This rally questions the strength of bears. The increasing uncertainty is further strengthened when the third day opens lower, but not lower than the low of the second day. There is some stability on the third day as evidenced by its small white body. Third day ends by a rally closing below the close of the second day. If price rises to new high on the fourth day, then a reversal of trend is confirmed.
Important Factors:
A confirmation on fourth day is advisable to show that that the downtrend has reversed. This may be in the form of a white candlestick, a large gap up or a higher close on the fourth day.
RSI positive and negative reversals put price action of the underlying security first and the indicator second, which is the way it should be. Bearish and bullish divergences place the indicator first and price action second. By putting more emphasis on price action, the concept of positive and negative reversals challenges our thinking towards momentum oscillators.
$IXMD BarChart Technical Analysis
http://www.barchart.com/technicals/stocks/IXMD
FOUR PRICE DOJI
The Four Price Doji is a single candlestick pattern. It is simply a horizontal line that has no upper or lower shadows.

Recognition Criteria:
1. The body is a horizontal line.
2. There are no upper or lower shadows at all.
3. The open, close, high and low are the same throughout the entire day.
Explanation:
A Four Price Doji is a very rare occurrence and it may be seen only if all the four price components are equal. That is, the open, high, low, and close turn out to be the same. It represents complete and total uncertainty by traders concerning the market direction.
Important Factors:
The Four Price Doji usually occurs when a stock is very illiquid, has low volume, or the data source do not report any other price other than the closing price.
The Four Price Doji is not reliable like most other single candlestick patterns. It only reflects one day's trading and conveys a sense of complete indecision. It usually is interpreted as a reversal pattern however this indicator must be used with other candlesticks for a healthier judgment about the course of the trend.
Like all other doji types, Four Price Doji is also important only in markets where there are not many doji. In a chart characterized by many doji, the emergence of Four Price Doji do not have a signal value.
When the MACD is above zero, the short-term average is above the long-term average, which signals upward momentum. The opposite is true when the MACD is below zero. As you can see from the chart above, the zero line often acts as an area of support and resistance for the indicator.
$SUTI BarChart Technical Analysis
http://www.barchart.com/technicals/stocks/SUTI
Pivot Points ~ Setting the Tone
The Pivot Point sets the general tone for price action. This is the middle line of the group that is marked (P). A move above the Pivot Point is positive and shows strength. Keep in mind that this Pivot Point is based on the prior period's data. It is put forth in the current period as the first important level. A move above the Pivot Point suggests strength with a target to the first resistance. A break above first resistance shows even more strength with a target to the second resistance level.

The converse is true on the downside. A move below the Pivot Point suggests weakness with a target to the first support level. A break below the first support level shows even more weakness with a target to the second support level.
Price Performance - The percentage change of the closing value for a ticker. The starting point for the formula is the first closing value on the left edge of the chart.
$NMPNF BarChart Technical Analysis
http://www.barchart.com/technicals/stocks/NMPNF
DIAMONDs
These ETF shares, Diamonds Trust Series I, track the Dow Jones Industrial Average. The fund is structured as a unit investment trust. The ticker symbol of the Dow Diamonds is (NYSE:DIA), and it trades on the New York Stock Exchange.
SCTR tables can easily be sorted to separate the strongest stocks from the weakest. In any given SCTR universe, the top 10% will rank between 90 and 100, while the bottom 10% will rank between 0 and 10. A stock scoring 50 would be average, showing neither relative weakness nor relative strength. In general, scores between 40 and 60 are considered average. Signs of technical weakness start to appear as scores move below 40. Signs of technical strength emerge when scores move above 60.
$APDN BarChart Technical Analysis
http://www.barchart.com/technicals/stocks/APDN
TRIX oscillates around a zero line so like most oscillating indicators a positive value indicates an overbought market and a negative value indicates an oversold market. Thus when the TRIX crosses above the zero line it gives a buy signal, and when it closes below the zero line, it gives a sell signal.
History of ETF’s
ETFs had their genesis in 1989 with Index Participation Shares, an S
$USDC BarChart Technical Analysis
http://www.barchart.com/technicals/stocks/USDC
The Rate-of-Change indicators were then smoothed with a weighted moving average. As its name implies, a weighted moving average puts more weight on recent data and less weight on older data. For example, a 3-period WMA would multiply the first data point by 1, the second data point by 2 and the third data point by 3. The sum of these three numbers is then divided by 6, which is the sum of the weightings (1 2 3), to create a weighted average. The table below shows a calculation from an excel spreadsheet.
Bullish Morning Doji Star
• Direction: Bullish
• Type: Reversal
• Reliability: Strong

• After an established down trending day-one is a long red day
• Day-two is a doji where the open and close are equal.
• Day-three is a blue day
Bullish Morning Doji Stars are a rare reversal pattern that offers one of the strongest bullish reversal signals in the Forex Market. Morning Star formations are characterized by a continuation of a bearish trend followed by a Doji, reflecting uncertainty in the strength of trend.
Up to day two we actually have a Doji Star formation, a moderate strength bullish pattern. After the day of indecision, the trend reversal is confirmed when a rally creates the large bullish candle. The stronger the move up on day-three, the stronger the reversal signal. Watch for additional bullish price action in the next few days.
In FX this formation practically identical to the bullish Abandoned baby. In non-FX markets candlestick analysts traditionally look for gaps to signal the strength of the Morning Doji Star pattern. Gaps between the close price and open price are very common outside efficient FX markets, since exchanges are traditionally limited to very short trading periods. Because Foreign Exchange trades 24 hours, gaps are very uncommon and need to be ignored in identifying Morning Star patterns.
$PREV BarChart Technical Analysis
http://www.barchart.com/technicals/stocks/PREV
Raw Money Flow is essentially dollar volume because the formula is volume multiplied by the typical price. Raw Money Flow is positive when the typical price advances from one period to the next and negative when the typical price declines. The Raw Money Flow values are not used when the typical price is unchanged. The Money Flow Ratio in step 3 forms the basis for the Money Flow Index (MFI).
Form N-4 ~ SEC Filings Explained
Initial registration statement on Form N-4 for separate accounts (unit investment trusts)
$TIRXF BarChart Technical Analysis
http://www.barchart.com/technicals/stocks/TIRXF
A trader using RSI should be aware that large surges and drops in the price of an asset will affect the RSI by creating false buy or sell signals. The RSI is best used as a valuable complement to other stock-picking tools.
Nasdaq-100 Index Tracking Stock (Nasdaq:QQQQ)
This ETF represents the Nasdaq-100 Index, which consists of the 100 largest and most actively traded non-financial stocks on the Nasdaq, QQQQ offers broad exposure to the tech sector. Because it curbs the risk that comes with investing in individual stocks, the QQQQ is a great way to invest in the long-term prospects of the technology industry. The diversification it offers can be a huge advantage when there's volatility in the markets. If a tech company falls short of projected earnings, it will likely be hit hard. Between 2000 and 2004, QQQQ was by far the most heavily traded index fund.
$IPRU BarChart Technical Analysis
http://www.barchart.com/technicals/stocks/IPRU
The use of Bollinger Bands varies widely among traders. Some traders buy when price touches the lower Bollinger Band and exit when price touches the moving average in the center of the bands. Other traders buy when price breaks above the upper Bollinger Band or sell when price falls below the lower Bollinger Band.
Form N-CSRS ~ SEC Filings Explained
Certified semi-annual shareholder report of registered management investment companies
$ASIBY BarChart Technical Analysis
http://www.barchart.com/technicals/stocks/ASIBY
Chaikin Money Flow (CMF) is an oscillator that fluctuates between -1 and 1. Rarely, if ever, will the indicator reach these extremes. It would take 20 consecutive closes on the high (low) for 20-day Chaikin Money Flow to reach 1 (-1). Typically, this oscillator fluctuates between -.50 and .50 with zero as the center-line.
ARS~ SEC Filings Explained
Annual Report to Security Holders.
$PFFBQ BarChart Technical Analysis
http://www.barchart.com/technicals/stocks/PFFBQ
Ulcer index indicator measure the stress of holding trade and investment by simply measuring the price retracements. Ulcer Index is based in the notion which downward volatility is bad, however upward volatility is good. Unlike the standard deviation, the economic industry benchmark way of measuring risks of the stock that equally weights both increase to upside volatility and the violent decrease to downside volatility.
STSC monster MJ reverse merger play!!! New company also involved in the hotel, restaurant and nightclub business!
$$$ Holding for dollars!!! $$$
BULLISH STICK SANDWICH
The Bullish Stick Sandwich Pattern is characterized by consecutive higher opens for three days, but results in an eventual close equal to the first day's close. It may warn that prices are now finding a support price. We may then see a reversal from this support level.

Recognition Criteria:
1. Market is characterized by downtrend.
2. We see a Black Closing Marubozu in the first day.
3. Then we see a white candlestick, which is above the close of the first day.
4. Then we again see a Black Closing Marubozu characterized with a close equal to the close of the first day.
Explanation:
In the Bullish Stick Sandwich Pattern, there is a downtrend going on. Then prices open higher on the next trading day and they reach to higher levels all day, closing at or near the high. This bullish act suggests that the previous downtrend may now reverse implying that the shorts need protection. The next day, prices open at a higher level leading some shorts to cover their positions initially but then the prices start moving lower to close at the same price as two days ago. This pattern shows that the market is finding a support level and now the trend may reverse from this support level.
Important Factors:
A confirmation on the fourth day is required to be sure that the downtrend is reversed. Confirmation may be in the form of a white candlestick, a large gap up or a higher close on the fourth day.
$MDHI BarChart Technical Analysis
http://www.barchart.com/technicals/stocks/MDHI
|
Followers
|
3289
|
Posters
|
|
|
Posts (Today)
|
0
|
Posts (Total)
|
2804248
|
|
Created
|
08/22/10
|
Type
|
Free
|
| Moderator Nilbud | |||
| Assistants mick ManicTrader PhotoChick Kirimi $Pistol Pete$ | |||
   Investor Hub Alerts: Sign up for 'STOCKGOODIES PLAYS OF THE WEEK ' E-Mail List Investor Hub Alerts: Sign up for 'STOCKGOODIES PLAYS OF THE WEEK ' E-Mail ListUPDATE; 5-1-22 courtesy of charting /\ wit tweezer top calls /\ Tony @Montana_Trades Really good study sheet on Candlestick Patterns [-chart]pbs.twimg.com/media/FRn8188XMAAdZvk?format=jpg&name=small[/chart] 

02-07-2021
|
|
Posts Today
|
0
|
|
Posts (Total)
|
2804248
|
|
Posters
|
|
|
Moderator
|
|
|
Assistants
|
| Volume | |
| Day Range: | |
| Bid Price | |
| Ask Price | |
| Last Trade Time: |