


Monday, August 20, 2007 10:20:29 AM
The unauthorized USER (pre)MANUAL … V3
In the current absence of a User Manual from iFinix, we are pleased to provide the unauthorized USER (pre) MANUAL for the iFinix RealTime Platform.
The manual (printed below), might not be the current release. To be sure that you are reading the current release, go to the iHub “iFinix Trading Platform Technical Board” at
http://investorshub.advfn.com/boards/board.asp?board_id=9841
and use the link in the Board’s iBox for the current version of The unauthorized USER (pre)MANUAL.
The iBox also contains links for:
- Need iFinix RealTime problem support, or subscription assistance?
- Need a fresh copy of the program for crash recovery?
=-=-=-=-=-=-=-=-=-=-=-=-=-=-=-=-=-=-=-=-=-=-=-=-=-=-=-=-=
Version 3
=-=-=-=-=
Program Startup:
A fresh copy of the program can be downloaded at any time from http://www.ifinix.com/ifinixrealtime/ This would normally only be done for crash recovery, or as part of the setup for a new user. To start the program, you must supply a valid Username and Password. Occasionally a valid username/Password will fail. If this happens, just click on “OK” then click on “Login” again and the system should start.
The Login Failed message shows up for me whenever there’s a new version loading and my Virus Checker gets in the way wanting to know if the new program is ok. I tell it to accept it and it does. Typically I have to respond to one or more error acknowledgments a time or too then click on login and everything is fine.
On startup, the system automatically checks the iFinix website for an available newer version of the Platform. If it finds one, it will download the new version automatically, and will start up the new version with no further intervention.
The Menu Bar:
Each time you start the program, you will get a menu bar across the top of your screen. It’s a little intrusive, so let’s fix it first. Click on the “Menu” button (second from the left) and select properties (near the bottom). The menu’s Property window appears. Click the options tab and click on the 6 buttons as required to end up with only “Auto Hide” and “Show Text” selected (shown as “text” rather than as buttons). This will keep the menu bar out of the way until you jam your mouse cursor up against the top of the screen, then it will appear again. Select the Property window’s View tab, and change the text color to black … much easier to read. Click “Apply” at the bottom, then “OK”. Everything in the Menu Bar so far is optional. Feel free to make your own decisions.
Go get the menu bar at the top again with your cursor (doing the above will have hidden it). Click on the Menu icon on the Menu bar and click on “Save Settings”. This will save the changes that you made to the menu bar.
There are 5 icons on the menu that start up Platform windows that will likely first be of interest; “Quote”, “Offer Book”, “Time of Sales”, “Chart”, and “Ticker”. They all have a lot of common concepts and approaches to their setup and use. Some comments on them are presented below in the Platform windows section.
Note: The only approved method for closing the Platform is “Menu”/”Exit” to get out. Other rude approaches can confuse things. “Log Off” keeps the program loaded in memory, but removes the open Platform windows, and the Menu window icons. A subsequent Login (called from the Menu) brings you back to a newly started up condition without needing the time to reload the (already loaded) Platform. It’s not clear why this feature is in the system, but Log Off, then Log On, will not check for new Platform updates.
The Platform windows - general:
Each click on the Menu Bar window icons will bring up a copy of the selected window. Multiple copies of the same window are allowed (perhaps one Offer Book, or one Chart, for each stock of current interest).
Each window can be customized. There are “View” and “Settings” options that control what information is presented in a given window, and allow extensive control over colors, fonts, and display space sizing. Some sample usage follows for some of the windows.
There is limited ability to save your configuration of the Platform windows at this time. To save your current environment of the windows that you have created (from the Menu Bar), go to the Menu Bar, click on Menu, and save your current environment with “Save Workspace”. You get to name the environments that you save, under names that you assign. The next time that you restart the Platform, you can retrieve a saved environment with “Menu”/”Load Workspace”. Multiple environments can be saved for users that have different approaches to different groups of stocks.
Currently, all that is saved by Save Workspace are the windows in use, their size and position, and in some cases the stock ticker assigned to each window. Any changes made through View or Settings are lost, and must be reentered if the Platform is closed, then re-started. Customer Support has advised that Save Workspace will, in the future, also preserve the Properties that you set.
The Quote window
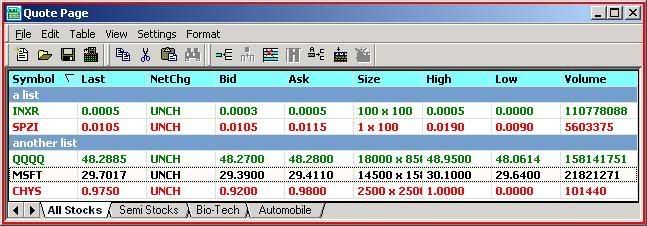
From the Menu Bar, select “Quote”. Start by selecting “Settings” at the top, then “Properties”, then the “Others” tab. This is where you should set the decimal width to 5, or 2, or whatever you want. The default is 4. Next press “Apply”, then “OK”. Next on the Quote page, click on “Edit”, then “Symbols”. You get to create “Groups” (like Windows folders) to hold your stock tickers but this is optional. You can create a Group named “my Pink Sheets” (or any other name you choose), then click on the small red + sign below it to register it. Once that is done, enter a symbol like “INXR” in the Symbol section, and click on the red + sign near the bottom to register it. Add more as desired (and more lists as desired). Once they are entered, click on “OK” at the bottom. The sample window above uses lists called “a list”, and “another list”.
The Offer Book window
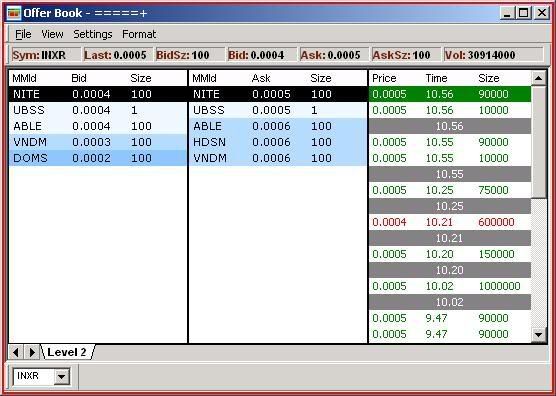
Go get the menu bar at the top again with your cursor, and this time select “Offer Book”. If desired, set the decimals (“Settings”/“Properties”/“Others”) and finish with “Apply” and “OK”. At the bottom left corner of the “Offer Book” screen enter the ticker of your choice, then hit <enter> to see it work. It appears that this control should be able to look after a list of symbols, but it isn’t yet clear to me as to how to make this happen.
Select “View” from the top, and click on TOS (Time of Sales). Poof! a TOS section is added to the Offer Book window. Cool.
We used to have to set the width of the Volume text box on our own, as the default width was too narrow to hold the hundreds of millions of shares that can go through INXR in a day. It has a more appropriate (wider) default now. Should you wish to change the width of any of the other text boxes, see the notes below under “Taking Control”.
The Ticker window
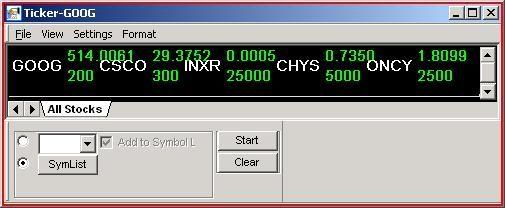
The “Ticker” windows interconnection between the controls is not totally clear to me, but some results can be generated
Try entering a stock’s ticker symbol in the text box, then clicking on the Start button. You should get a scrolling Ticker with a single stock symbol.
With the “Add to Symbol List” box checked, any ticker entered is added to a list. Enter two or three additional stock symbols (each replacing the previous one before hitting <enter> after each entry), then press the down arrow (triangle) to the right of the text box to see the list. To get the new entries to join the scrolling list at the top, fool around with pressing start, Pause, and Clear. To me, their actions are inconsistent, which probably means that there’s a rule that I don’t understand.
By clicking on the SymList (Symbol List) button, you will see your stock list. The intent here is to offer you an easy way to customize your list by selecting active entries from the right side, then moving them to the inactive (left) side by clicking on the << arrow key. If selecting something on the left, the >> arrow key brings it back to the right. Additional stock symbols can be added here too by entering one in the box at the top, then pressing <enter>.
To give SymList control to the scrolling ticker, you have to click on the “radio button” beside the “SymList” button on the main Ticker screen, and then play with the Start/Pause/Clear buttons. I have had some luck in customizing the group displayed through this means, but I don’t quite have the whole story yet. I suspect that the program logic needs a little refining, or at least the functionality clarified, but it could just be me.
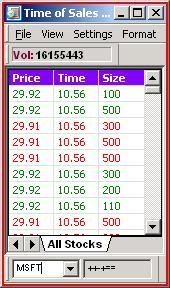
The Time of Sales (TOS) window
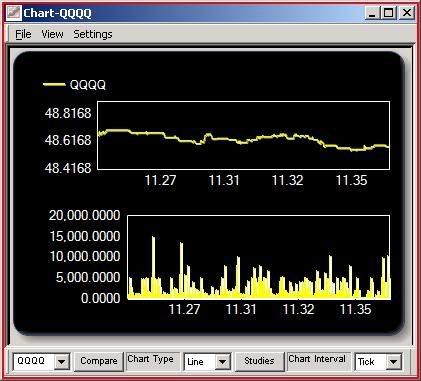
The Chart window
Taking control
There is a lot of control available for you to set up your own preferred layout in the Platform windows. Some general approaches are described here.
Properties: Changes made in the “Settings/Properties” of any given Platform window type, like the Offer Book for example, will automatically be applied to all other windows of the same type. Want to change the items displayed in the Offer Book’s Quote Bar? … go ahead, and when you click on Apply or OK, all the open Offer Book windows will be updated at the same time. Future windows of the same type opened during the current session will also be implemented automatically with your changes. One word of caution … the decimal setting (one of the properties) also links across all of the same type of window. I have suggested to customer support that this property should tie only to the current window (for a given stock), whereas linking the general layout seems a reasonable thing across all of the same screen type.
Text box sizes: For the Offer Book, click on Settings / Properties, and then select “Quote Bar” from the control at the top. Click on the “General” tab. Click on Volume (or any other entry) in the control list, then in the “Set Control Size” area (top right) click on the right edge of the rectangle, and while continuing to hold down the left mouse button, drag the right edge to the right. The width value in the box below will changed from it’s starting value. The height can be changed similarly by dragging the top or bottom edge. Just below, for “Assign this size to”, click on the scope you want … the selected item only, all the items, or all the “same type” controls. Experiment on your own, to figure out what the “types” are. “Apply”, “OK”, and you’re done.
Format: From the “File View Settings Format” line, choosing “Format/Font” or “Format/Color” seems to get you to the same screen as “Settings/Properties”. The “Format/Grid” toggle can only be found here though, or by right clicking on the body of the window. By toggling the Grid to on (check mark visible), horizontal and vertical lines (a grid) will be overlaid on the displayed data. Clicking on it again will remove it. This is a local control, and does not transfer automatically to the other windows of the same type, like many of the “Settings/Properties” do.
Some errors to watch for
In general, if your system won’t start the program running, or something is clearly wrong; you might be a victim to an earlier "rude" exit from the program. Turning your machine off, and restarting it, will solve the problem if a (non-visible) piece of the old program is still in memory, and running. There is a less intrusive approach available though, through the Windows “Task Manager” …
While holding down the <Ctrl> and <Alt> keys, press the <Delete> key once. Within a few seconds the “Task Manager” window will show up. Select “Process” (if it hasn’t already been selected) then click on “Image Name” (just for convenience) to sort the Process Name column by Name. Select any Processes with a name starting with iFinix, and then click on the “End Process” button in the bottom right corner. This will fix this sort of problem.
Close the Task Manager window, and restart the iFinix RealTime Platform.
If this doesn’t solve your problem, then …
There might be an easier way, but both the “Montage application has encountered a problem” error and the “Debug Assertion Failed” errors will go away if you if you download a fresh version of the system to get rid of the problem (see Crash Recovery in the iBox).
If you get one of these errors on exiting the program, you will get a choice of “Abort”, “Retry”, and “Ignore”. For these errors: select “Ignore” (if you might get the message twice, do it twice) and the process will continue and will give you a clean exit. “Abort” will drop you out right away, and can leave pieces in memory that still must be removed (see above). “Retry” is generally only a useful option for errors if the error is for a printer out of paper, and you have some more paper that you can put in first.
It seems that these two errors are tied to attempting to save your settings. It turns out that saving the “properties” for individual windows, like the “Offer Book” window is not yet implemented. So setting up (and saving) colors, available fields, width of the Volume field, number of decimals, etc. does not work at this time. Similarly, accumulated transaction data is not saved. This should be implemented soon, but there are other priorities being worked on first. When the ability to save your properties is in place, the properties will be saved by individual windows, like the Offer Book window, by clicking on File / Save Settings at the top left corner of that window. DON’T do it now though … I think that that is what has been causing at least some of the error messages and a need to download a fresh version of the program.
Odds and ends
Unfortunately, the “Menu / About iFinix RealTime” still gives the original release version of 1.0.0.2 so there is no way to easily tell the support people which version you are running. One of the support people told me that she would elevate the version number problem. This is really important for identifying problems in a new system.
Another little quirk. When the Offer Book screen comes up, the stock symbol is already filled in now, but you still have to select it and hit enter.
There are other things, in addition to the above, that you might want to play with (I changed most of the foreground and background colors (under “Styles”) on the Properties window for the “Time of Sales” screen), but by now you will have a feel for how the interface works and can explore on your own.
One last item … although the install screen says that you require .NET Framework 2.0 and Visual C++ Runtime Libraries (x86), you don’t actually have to have them in advance. During the install, the required components are installed automatically for you if you don’t already have them.
I wasn’t too pleased with the lack of a “help” system; but once I got through the above discovery, things settled down nicely
Errors in this manual
Of course there are some … lots of missing stuff too. Get over it, and let me know what they are.
rjc
In the current absence of a User Manual from iFinix, we are pleased to provide the unauthorized USER (pre) MANUAL for the iFinix RealTime Platform.
The manual (printed below), might not be the current release. To be sure that you are reading the current release, go to the iHub “iFinix Trading Platform Technical Board” at
http://investorshub.advfn.com/boards/board.asp?board_id=9841
and use the link in the Board’s iBox for the current version of The unauthorized USER (pre)MANUAL.
The iBox also contains links for:
- Need iFinix RealTime problem support, or subscription assistance?
- Need a fresh copy of the program for crash recovery?
=-=-=-=-=-=-=-=-=-=-=-=-=-=-=-=-=-=-=-=-=-=-=-=-=-=-=-=-=
Version 3
=-=-=-=-=
Program Startup:
A fresh copy of the program can be downloaded at any time from http://www.ifinix.com/ifinixrealtime/ This would normally only be done for crash recovery, or as part of the setup for a new user. To start the program, you must supply a valid Username and Password. Occasionally a valid username/Password will fail. If this happens, just click on “OK” then click on “Login” again and the system should start.
The Login Failed message shows up for me whenever there’s a new version loading and my Virus Checker gets in the way wanting to know if the new program is ok. I tell it to accept it and it does. Typically I have to respond to one or more error acknowledgments a time or too then click on login and everything is fine.
On startup, the system automatically checks the iFinix website for an available newer version of the Platform. If it finds one, it will download the new version automatically, and will start up the new version with no further intervention.
The Menu Bar:
Each time you start the program, you will get a menu bar across the top of your screen. It’s a little intrusive, so let’s fix it first. Click on the “Menu” button (second from the left) and select properties (near the bottom). The menu’s Property window appears. Click the options tab and click on the 6 buttons as required to end up with only “Auto Hide” and “Show Text” selected (shown as “text” rather than as buttons). This will keep the menu bar out of the way until you jam your mouse cursor up against the top of the screen, then it will appear again. Select the Property window’s View tab, and change the text color to black … much easier to read. Click “Apply” at the bottom, then “OK”. Everything in the Menu Bar so far is optional. Feel free to make your own decisions.
Go get the menu bar at the top again with your cursor (doing the above will have hidden it). Click on the Menu icon on the Menu bar and click on “Save Settings”. This will save the changes that you made to the menu bar.
There are 5 icons on the menu that start up Platform windows that will likely first be of interest; “Quote”, “Offer Book”, “Time of Sales”, “Chart”, and “Ticker”. They all have a lot of common concepts and approaches to their setup and use. Some comments on them are presented below in the Platform windows section.
Note: The only approved method for closing the Platform is “Menu”/”Exit” to get out. Other rude approaches can confuse things. “Log Off” keeps the program loaded in memory, but removes the open Platform windows, and the Menu window icons. A subsequent Login (called from the Menu) brings you back to a newly started up condition without needing the time to reload the (already loaded) Platform. It’s not clear why this feature is in the system, but Log Off, then Log On, will not check for new Platform updates.
The Platform windows - general:
Each click on the Menu Bar window icons will bring up a copy of the selected window. Multiple copies of the same window are allowed (perhaps one Offer Book, or one Chart, for each stock of current interest).
Each window can be customized. There are “View” and “Settings” options that control what information is presented in a given window, and allow extensive control over colors, fonts, and display space sizing. Some sample usage follows for some of the windows.
There is limited ability to save your configuration of the Platform windows at this time. To save your current environment of the windows that you have created (from the Menu Bar), go to the Menu Bar, click on Menu, and save your current environment with “Save Workspace”. You get to name the environments that you save, under names that you assign. The next time that you restart the Platform, you can retrieve a saved environment with “Menu”/”Load Workspace”. Multiple environments can be saved for users that have different approaches to different groups of stocks.
Currently, all that is saved by Save Workspace are the windows in use, their size and position, and in some cases the stock ticker assigned to each window. Any changes made through View or Settings are lost, and must be reentered if the Platform is closed, then re-started. Customer Support has advised that Save Workspace will, in the future, also preserve the Properties that you set.
The Quote window
From the Menu Bar, select “Quote”. Start by selecting “Settings” at the top, then “Properties”, then the “Others” tab. This is where you should set the decimal width to 5, or 2, or whatever you want. The default is 4. Next press “Apply”, then “OK”. Next on the Quote page, click on “Edit”, then “Symbols”. You get to create “Groups” (like Windows folders) to hold your stock tickers but this is optional. You can create a Group named “my Pink Sheets” (or any other name you choose), then click on the small red + sign below it to register it. Once that is done, enter a symbol like “INXR” in the Symbol section, and click on the red + sign near the bottom to register it. Add more as desired (and more lists as desired). Once they are entered, click on “OK” at the bottom. The sample window above uses lists called “a list”, and “another list”.
The Offer Book window
Go get the menu bar at the top again with your cursor, and this time select “Offer Book”. If desired, set the decimals (“Settings”/“Properties”/“Others”) and finish with “Apply” and “OK”. At the bottom left corner of the “Offer Book” screen enter the ticker of your choice, then hit <enter> to see it work. It appears that this control should be able to look after a list of symbols, but it isn’t yet clear to me as to how to make this happen.
Select “View” from the top, and click on TOS (Time of Sales). Poof! a TOS section is added to the Offer Book window. Cool.
We used to have to set the width of the Volume text box on our own, as the default width was too narrow to hold the hundreds of millions of shares that can go through INXR in a day. It has a more appropriate (wider) default now. Should you wish to change the width of any of the other text boxes, see the notes below under “Taking Control”.
The Ticker window
The “Ticker” windows interconnection between the controls is not totally clear to me, but some results can be generated
Try entering a stock’s ticker symbol in the text box, then clicking on the Start button. You should get a scrolling Ticker with a single stock symbol.
With the “Add to Symbol List” box checked, any ticker entered is added to a list. Enter two or three additional stock symbols (each replacing the previous one before hitting <enter> after each entry), then press the down arrow (triangle) to the right of the text box to see the list. To get the new entries to join the scrolling list at the top, fool around with pressing start, Pause, and Clear. To me, their actions are inconsistent, which probably means that there’s a rule that I don’t understand.
By clicking on the SymList (Symbol List) button, you will see your stock list. The intent here is to offer you an easy way to customize your list by selecting active entries from the right side, then moving them to the inactive (left) side by clicking on the << arrow key. If selecting something on the left, the >> arrow key brings it back to the right. Additional stock symbols can be added here too by entering one in the box at the top, then pressing <enter>.
To give SymList control to the scrolling ticker, you have to click on the “radio button” beside the “SymList” button on the main Ticker screen, and then play with the Start/Pause/Clear buttons. I have had some luck in customizing the group displayed through this means, but I don’t quite have the whole story yet. I suspect that the program logic needs a little refining, or at least the functionality clarified, but it could just be me.
The Time of Sales (TOS) window
The Chart window
Taking control
There is a lot of control available for you to set up your own preferred layout in the Platform windows. Some general approaches are described here.
Properties: Changes made in the “Settings/Properties” of any given Platform window type, like the Offer Book for example, will automatically be applied to all other windows of the same type. Want to change the items displayed in the Offer Book’s Quote Bar? … go ahead, and when you click on Apply or OK, all the open Offer Book windows will be updated at the same time. Future windows of the same type opened during the current session will also be implemented automatically with your changes. One word of caution … the decimal setting (one of the properties) also links across all of the same type of window. I have suggested to customer support that this property should tie only to the current window (for a given stock), whereas linking the general layout seems a reasonable thing across all of the same screen type.
Text box sizes: For the Offer Book, click on Settings / Properties, and then select “Quote Bar” from the control at the top. Click on the “General” tab. Click on Volume (or any other entry) in the control list, then in the “Set Control Size” area (top right) click on the right edge of the rectangle, and while continuing to hold down the left mouse button, drag the right edge to the right. The width value in the box below will changed from it’s starting value. The height can be changed similarly by dragging the top or bottom edge. Just below, for “Assign this size to”, click on the scope you want … the selected item only, all the items, or all the “same type” controls. Experiment on your own, to figure out what the “types” are. “Apply”, “OK”, and you’re done.
Format: From the “File View Settings Format” line, choosing “Format/Font” or “Format/Color” seems to get you to the same screen as “Settings/Properties”. The “Format/Grid” toggle can only be found here though, or by right clicking on the body of the window. By toggling the Grid to on (check mark visible), horizontal and vertical lines (a grid) will be overlaid on the displayed data. Clicking on it again will remove it. This is a local control, and does not transfer automatically to the other windows of the same type, like many of the “Settings/Properties” do.
Some errors to watch for
In general, if your system won’t start the program running, or something is clearly wrong; you might be a victim to an earlier "rude" exit from the program. Turning your machine off, and restarting it, will solve the problem if a (non-visible) piece of the old program is still in memory, and running. There is a less intrusive approach available though, through the Windows “Task Manager” …
While holding down the <Ctrl> and <Alt> keys, press the <Delete> key once. Within a few seconds the “Task Manager” window will show up. Select “Process” (if it hasn’t already been selected) then click on “Image Name” (just for convenience) to sort the Process Name column by Name. Select any Processes with a name starting with iFinix, and then click on the “End Process” button in the bottom right corner. This will fix this sort of problem.
Close the Task Manager window, and restart the iFinix RealTime Platform.
If this doesn’t solve your problem, then …
There might be an easier way, but both the “Montage application has encountered a problem” error and the “Debug Assertion Failed” errors will go away if you if you download a fresh version of the system to get rid of the problem (see Crash Recovery in the iBox).
If you get one of these errors on exiting the program, you will get a choice of “Abort”, “Retry”, and “Ignore”. For these errors: select “Ignore” (if you might get the message twice, do it twice) and the process will continue and will give you a clean exit. “Abort” will drop you out right away, and can leave pieces in memory that still must be removed (see above). “Retry” is generally only a useful option for errors if the error is for a printer out of paper, and you have some more paper that you can put in first.
It seems that these two errors are tied to attempting to save your settings. It turns out that saving the “properties” for individual windows, like the “Offer Book” window is not yet implemented. So setting up (and saving) colors, available fields, width of the Volume field, number of decimals, etc. does not work at this time. Similarly, accumulated transaction data is not saved. This should be implemented soon, but there are other priorities being worked on first. When the ability to save your properties is in place, the properties will be saved by individual windows, like the Offer Book window, by clicking on File / Save Settings at the top left corner of that window. DON’T do it now though … I think that that is what has been causing at least some of the error messages and a need to download a fresh version of the program.
Odds and ends
Unfortunately, the “Menu / About iFinix RealTime” still gives the original release version of 1.0.0.2 so there is no way to easily tell the support people which version you are running. One of the support people told me that she would elevate the version number problem. This is really important for identifying problems in a new system.
Another little quirk. When the Offer Book screen comes up, the stock symbol is already filled in now, but you still have to select it and hit enter.
There are other things, in addition to the above, that you might want to play with (I changed most of the foreground and background colors (under “Styles”) on the Properties window for the “Time of Sales” screen), but by now you will have a feel for how the interface works and can explore on your own.
One last item … although the install screen says that you require .NET Framework 2.0 and Visual C++ Runtime Libraries (x86), you don’t actually have to have them in advance. During the install, the required components are installed automatically for you if you don’t already have them.
I wasn’t too pleased with the lack of a “help” system; but once I got through the above discovery, things settled down nicely
Errors in this manual
Of course there are some … lots of missing stuff too. Get over it, and let me know what they are.
rjc
Join the InvestorsHub Community
Register for free to join our community of investors and share your ideas. You will also get access to streaming quotes, interactive charts, trades, portfolio, live options flow and more tools.